Open Photoshop and create a new document. I am using 1920x900 pixels. After that fill the layer with a gradient #000000 and #303030 for colors and tilt it for better effect.
Step 2
Go to filter > blur > gaussian blur and fill with 100 for radius.
Step 3
Add a new layer above it and fill it with #d91f26. Set is blend mode to Multiply.
Step 4
Time to add some text. I'm using the original logo font, called Benguiat. The weight is bold. You can buy it at MyFonts, or feel free to use a bold, serif font of your choice. Adjust the text so that it has 2 lines, the top one being wider than the bottom one. Turn all text black (#000000).
Step 5
Group the text. In its blending options add a stroke of 10px, #d91f26 for color.
Step 6
Inside the group add 3 black, rounded rectangles, a wide one at the top and 2 smaller ones at the sides. Duplicate this group and turn the copy invisible, because we'll save it for later.
Step 7
Add a new layer below the visible group and fill it with #000000.
Step 8
Merge the group with this new black layer.
Step 9
Set the blending mode to Color Dodge.
Step 10
Duplicate this layer, and set the blending mode of the copy to Overlay.
Step 11
Turn visible the copied group from ealier. Make its stroke thinner, from 10px to 8px. Add a new layer above this group.
Step 12
Merge the new layer with this group. Go to filter > blur > gaussian blur. Set it to 1px and apply.
Step 13
For its blending mode, set it to Color Dogde, and Opacity 50%.
Step 14
Add new layer. Using a round brush add some strokes covering the logo.
Step 15
Add a gaussian blur of 100px to these strokes.
Step 16
Blending mode: Color Dodge, Opacity: 30%.
Step 17
Merge all visible layers. Duplicate it.
Step 18
Add noise to the top layer. Go to filter > noise > add noise. For values use Amount: 5%, Distribution: Gaussian, Monochromatic.
Step 19
Set its blending mode to Overlay, Opacity 70%.
Final Result
I know the final result it's not a clone of the original style, but it mimics the original pretty well. I hope it inspires you to keep trying to perfect it and even make a perfect clone.
Open Photoshop and create a new document. I'm using 2560x1440 pixels for the document size. After that I filled tha background layer with a dark grey. This part will be necessary to create the water drops.
Step 2
Go to Window>Brushes to create the brush for the water drops. Follow the image below for the settings but it's important to change the shape to an ellipse and also for this first part the brush has to be very soft.
Step 3
Add a new layer and group this layer into a folder. Then change the Blend Mode of the folder to Color Dodge. With the Brush Tool (B) and white for the color, paint with the Brush Tool some drops. As you can see the blurry edges of the little objects sort of melt with one another depending how close they are. That is really important to make the drops more realistic.
Step 4
Select the background layer and the group with the drops and merge them into on layer. After that go to Image>Adjustments>Levels. Change the Black Input to 124 and the White to 161. The values might vary depending on the drops, so just make sure that you get rid of the blurry edges.
Step 5
With the Magic Wand Tool (W) select the black area, then go to Select>Similar to make sure all the black areas get selected. Then delete this area.
Step 6
Import an image to use in our design. The one I'm using is courtesy from Thinkstockand you can find it here. Duplicate this layer because we will use it a few more times with different blur values.
Step 7
Go to Filter>Blur>Gaussian Blur. Use 20 pixels for the Radius.
Step 8
Go to Layer>Layer Styles>Color Overlay. Use a dark grey for the color and change the Opacity to 60%.
Step 9
Now put the water drops in front of the image and let's apply some layer styles to give them the realistic effect we want.
Step 10
Go to Layer>Layer Styles>Blending Options and change the Fill Opacity to 0. After that select Inner Shadow. Use white for the color and LInear Dodge for theBlend Mode, for the Opacity use 50%, for the angle 90º, then for the Distance use3 pixels and for the Size use 5 pixels. Also change the Contour mode to the Coneone.
Step 11
Select Bevel and Emboss. Change the Depth to 350%, the Direction to Down, the Size to 7 pixels, the Soften to 5 pixels, then over the Shading options use 54º for the Angle and 42º for the Altitude. Also change the Gloss Contour to the Cove Deep one, the for the Highlight Mode use 80% with white and Color Dodge for the Blend Mode, then for the Shadow Mode use Multiply with black and 50% of Opacity.
Step 12
Select Inner Glow then for the Blend Mode use Darken with 40% Oapcity and black for the color. Change the Source to Edge and the Size to 25 pixels.
Step 13
Now select Color Overlay and use (#907f72) for the color with Color Dodge with 45% Opacity.
Step 14
The last layer style option will be Drop Shadow. Use Multiply for the Blend Mode, black for the Color and 20% Opacity. Change the Angle to 90º and use 9 pixels for the Distance, 5% for the Spread and 10 pixels for the Size.
Step 15
Make the photo without blur visible again and go to Filter>Blur>Gaussian Blur. Use5 pixels this time. Then over the Layer Palette click with the right button of the mouse on the thumb of the water drops layer, then select "Select Pixel" to select just the water drops.
Select the photo that we applied the 5 pixles Gaussian Blur and go to Layer>Layer Mask>Reveal Selection. This way the image with 5 pixels blur will be only visible beneath the water drops.
Step 16
Select the layer mask that we created in the previous step and go toFilter>Blur>Motion Blur. Use -90º for the Angle and 80 pixels for the Distance.
Step 18
After the motion blur, go to Image>Adjustments>Levels. Change the black and white inputs again to get rid of the blurry edges caused by the blur. You will have an effect like the image below as if the water drops were running down on the window.
Step 19
Duplicate the layer with the photo that we applied the Gaussian Blur with 5 pixelsfor the radius only and delete the layer mask. The with the Horizontal Type Tool (T)add a text with a handwriting font, or if you have a tablet or is really good with the mouse you can write with your own handwriting. Again select just the pixels of the text like we did in the Step 15. Then mask this new photo with the shape of the text, so again the photo will be visible only beneath the text area.
Step 20
Add a new layer and with the Brush Tool (B) and the same brush we created the water drops, add more water drops and especially over the text area like the image below. To apply the same layer style of the water drops, just click with the right button of the mouse over the water drops layer and select Copy Layer Style, then on the new layer with the small water drops click again with the right click of the mouse and select Paste Layer Style.
Step 21
Duplicate the photo again and delete the layer mask, after that go to Layer>Layer Mask>Hide All. Select the thumb of the layer mask and go toFilter>Render>Clouds. Make sure you had black and white for the colors. This will apply a cloud texture to the foggy window effect, that will make it more realistic.
Step 22
Select all layers and duplicate them, after that merge all the duplicated layers into one. You can also use the keyboard shortcut Command+Alt+Shift+E. Then go toFilter>Blur>Gaussian Blur. Use 20 pixels for the Radius.
Step 23
Change the Blend Mode of this blurry layer to Overlay with 40% opacity.
Step 24
Duplicate the previous layer and just change the Blend Mode to Screen, keep the same 40% of Opacity.
Step 25
Add a new layer on top of the others and fill it with a radial gradient using dark grey and light grey for the colors. Also use Multiply for the Blend Mode.
Conclusion
Here is the outcome of the tutorial. As you can see the technique used is pretty simple it was all about Layer Styles, Masks and basic filters. The most important thing was to understand how to recreate the effect using the tools available in Photoshop, in this case I spend hours analyzing a foggy window trying to get the basic characteristics to make the effect realistic. Now it's up to you.
Before air conditioning and the electric box fan the only means that most people had to cool themselves on a hot day was a hand-held fan. Today, we will demonstrate how to illustrate a realistic, Japanese-style folding fan in Photoshop. Let’s get started!
Resources Used
The following resources were used during the production of this tutorial. To download them, just sign up at CG Textures. They are free!
Let's start this project by creating a new file 1000 x 800 px with a resolution of 300 ppi.
Step 2
Using the Paint Bucket tool, fill the entire layer with #b8b8b8.
Step 3
Next, open the file Paper.jpg and place it over the "Background" layer. Rename this layer "Wallpaper" then set its blending mode to Overlay.
Note: Paper.jpg is a large image, so press Cmd (Ctrl) + T to activate the resizing handles and adjust its size.
Step 4
Next, open Wood.jpg and place it over the "Wallpaper" layer. Rename this layer "Wood." Press Cmd (Ctrl) + T to resize the image. Resize it to make it smaller and place it in the middle of the canvas as shown.
Note: While resizing, hold down the Shift key to constrain the image both vertically and horizontally.
Step 5
Next, we'll add a 3D effect for the "Wood" layer to make it as if it is a wood plank. To do this, double-click the "Wood" layer to open its Layer Style window then apply the settings below.
Step 6
Now we'll make guidelines for the fan. To do this, add a new layer and name it "Outer Circles." Using the Elliptical Marquee tool (M) make two circles as shown below.
Step 7
Next, duplicate the "Outer Circles" layer by pressing Cmd (Ctrl) + J. Press Cmd (Ctrl) + T to resize the image as shown.
Note: While resizing, hold down the Shift + Alt key to evenly resize the image both vertically and horizontally on both sides.
Step 8
Using the Pen tool (P) make a set of lines (make sure to put every line on a new layer) following the indicated degrees, making a pizza-like diagram like as shown below.
Step 9
Merge the "Outer Circles," "Outer Circles copy" (duplicated layer of the "Outer Circles"), and the layers of all the lines by Cmd (Ctrl) + clicking the layers then right-clicking on it and selecting Merge Layers from the drop-down menu. Rename this layer as "Guidelines" and decrease its Opacity level to 50%.
Step 10
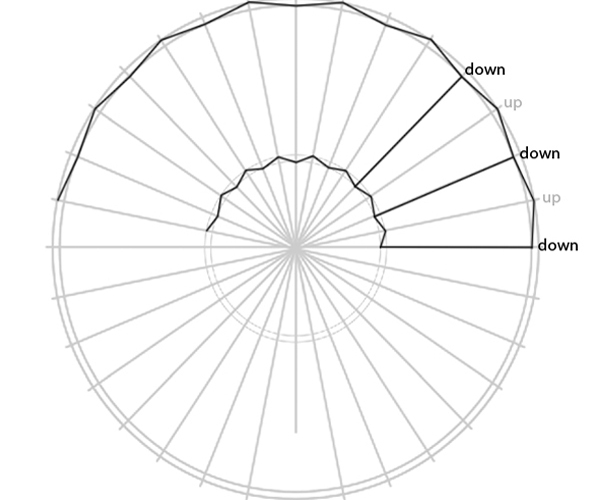
Next add a new layer and name it "Outer zigzag." Using the Pen tool (P), draw a path alternating from the inner circle going to the outer circle and back again to the inner circle until you’ve reached the 16th point from the 0 degree angle like as shown.
Step 11
When you’ve reached the 16th point, right-click and select Stroke Path from the drop-down menu. Prior to this, make sure to configure the Brush tool (B) to a Master Diameter of 2px, Hardness of 100%, Color #000000 and Opacity level of 100%.
Step 12
Next, add a new layer and name it as "Inner zigzag." Do exactly what we did in the "Outer zigzag" making sure to start from 0 degrees up to the 16th point.
Step 13
Now we will make the folding effect of the fan. To do this, we'll start by adding a new layer, after that follow the instructions below.
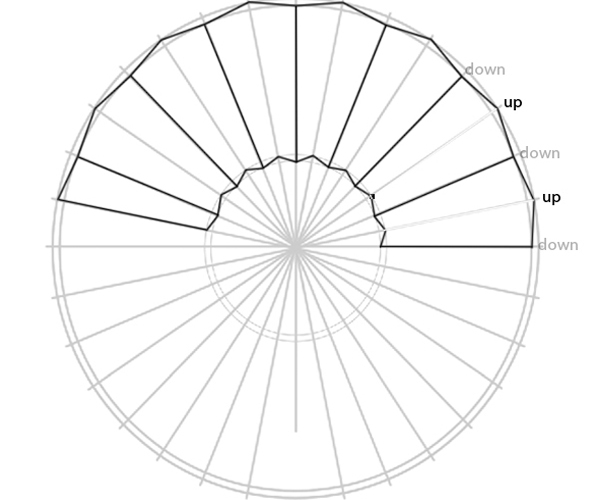
Note: Make sure to create each line in a different layer. Connect only the "down" portions of the zigzags.
After connecting all the "down" portions of the zigzag, including the 16th point from the 0 degrees, press Cmd (Ctrl) then left-click the layers comprising all the lines and select Merge Layers from the drop-down menu. After that rename the merged layer as "Black lines."
Step 14
Use the same technique as outlined in Step 13 but now connecting only the "up" portions of the zigzag with the Pen tool (P), having the same configuration for the Brush tool, but now using the color #ffffff. After that, merge all the layers and name it "White lines." Change its Blending mode to Overlay.
Step 15
On the "White lines" layer, use the Eraser tool (E), configured to a Size of 100px and a Hardness of 0%, to erase the indicated areas as shown below.
Step 16
Next, we will add some shading. Add a new layer and name it "Shades." Using the Pen tool (P), make a shape as shown below. After making the shape, right-click and choose Make Selection from the drop-down menu.
Fill the entire selection with #9f9f9f and set its Blending mode to Multiply.
Do this as shown until you reach the other side.
Step 17
Add a new layer and name it "Sticks." Using the Pen tool (P), make a shape like as shown below. After that, right-click and select Make Selection from the drop-down menu.
Using the Gradient tool (G), set to Linear Gradient, fill the entire selection with the colors indicated below.
To add some thickness, double-click the "Sticks" layer and apply the values shown below.
Step 18
Next duplicate the "Sticks" layer then hit Cmd (Ctrl) + T to activate the resizing handles. Reposition the center of rotation axis (a) to the center point of the fan (b) then rotate it to the next shade (c).
Continue duplicating and changing the angle of the sticks for every shade until you reach the second to the last shade from the right. After that drag all the stick layers to the Create a New Group icon in the Layers palette. Name this group "Sticks." Leave the last shade to separate the last stick from the rest of the sticks because we'll put it on a higher position on the Layers palette later on.
Step 19
Add a layer mask in the "Sticks" group and use the Elliptical Marquee tool (M) to make a circle as shown below. Using the Brush tool (B) erase the areas indicated below using #000000.
Note: make sure to place the "Sticks" group below the "Black lines," "White lines," "Shades," "Outer zigzag," and the "Inner zigzag" layer.
Step 20
Now to complete the set of sticks, duplicate another sticks layer but now take it out from the "Sticks" group. Use the Elliptical Marquee tool (M) and create a circle from the center of the fan just like what we did in Step 19, create a layer mask and erase the parts you don’t need. The final effect should look like the one shown below. Rename this layer as "Line separate."
Step 21
Next add a new layer and name it "Face." Using the Pen tool (P) draw a shape like the one shown below. Right-click and choose Make Selection from the drop-down menu.
Next, use the Gradient tool (G), set to Radial Gradient, to fill the entire selection with colors shown below.
Step 22
Add a new layer and name it "Circle". Using the Paint brush tool (B) and the Eraser tool (E) alternately follow the directions below.
With this technique, you can make an unlimited set of designs like the ones shown below.
Next, Cmd (Ctrl) + click the thumbnail on the "Circle" layer to activate the selection marquee around the shape. Apply a color gradient using the Gradient tool (G), set to Linear Gradient, using the color numbers indicated below.
Duplicate the "Circle" layer enough to make a pleasing design. Resize and reposition the "Circles" to form the design like the one shown below. Select the "circle" layers (original and duplicates) and drag them to Create a New Group in the Layers Palette. Name this group as "Design." After that, using a layer mask, the unwanted areas of the design to complete this step.
After hiding the "Guidelines" layer and rotating it upright, the product should look like the one shown below.
Note: Make sure to place the "Design" group and the "Face" layer below the "Black lines," "White lines," "Shades," "Outer zigzag," "Line separate," and the "Inner zigzag" layer.
Step 23
Open Fabric.jpg and drag it into our project. For the time-being, decrease its opacity to about 50% so that you can see the "Face" pattern underneath. Next, use the Pen tool (P) and follow the shape of the "Face" of the fan as shown below. Right-click and select Make Selection from the drop-down menu. Hold Cmd (Ctrl) + Shift + I to inverse the selection then hit delete. After that, increase the opacity level back to 100%. Rename this layer "Fabric" then change its Blending mode to Overlay.
Note: Make sure to place the "Fabric" layer below the "Shades" layer.
After unhiding some of the layers, your image should look similar to the one below.
Step 24
Next Cmd (Ctrl) + click the thumbnails of the "Sticks" layers (original and duplicates) and the "Face" layer in the Layers Palette. This will activate the selection marquee around the layers selected. Fill the entire selection with #000000 and place this layer under the "Sticks" group.
Next, go to Filter > Blur > Gaussian Blur and set the value of the radius to 2.0 px. Name this layer "Shadow 100." Duplicate the "Shadow 100" layer and reapply a Gaussian Blur with a radius of 4px then decrease its opacity level to 50%. Rename this layer "Shadow 50."
After revealing the texture layers your image should look similar to the one below.
Step 25
Now, add a new layer and name it "Bolt." Using the Elliptical Marquee tool (M) make a circle as shown below. Fill the entire selection with #000000.
Note: Hold down the Shift key to make perfect circles.
To make it more realistic, double-click the "Bolt" layer and apply the values below in the Layers Style window.
Step 26
Add a new layer and name it "Brownish." Using the Paint Bucket tool (G), fill the entire layer with color #442d00, set the Blending mode to Overlay and Opacity to 50%.
Step 27
Next, add a new layer and name it "Shader." Using the Paint Bucket tool (G), fill the entire layer with color #000000. Then, using the Eraser tool (E) with a size of 1200 px and Hardness of 0%, erase the areas indicated below three times.
Step 28
Next, add a new layer and name it "Light source." Using the Elliptical Marquee tool (M) make a shape as shown below then fill the entire selection with #000000.
Step 29
Press Cmd (Ctrl) + T to activate the resizing handles. Right-click from the selection and choose Perspective from the drop-down menu. Resize it as shown below.
Step 30
Go to Filter > Blur > Gaussian Blur and set its radius to 58 px.
Make some further adjustments using the Transformation tool (Cmd (Ctrl) + T) to make it more realistic.
Final Image
That's it! The final image is shown below. Hope you had fun working on this project and learned some additional skills and knowledge of Photoshop. Try using different patterns or pictures for the face of the fan for different results!